PERMISSIONS AND ACCES TO REQUESTS
Table of Contents
CDESK offers a wide range of settings to access requests, so that as many usage scenarios as possible can be covered.
When creating a new account, access to requests is preset based on user group assignment – assignee (W), operator (O+W), administrator (A), customer (C). The individual groups have the following permissions by default:
- Assignee (W) – access to assignee´s own requests, to requests by organizational structure and by deal.
- Operator (O+W) – access to operator´s own requests and requests of others, access to records of subordinates, access to requests according to the organizational structure and access according to the deal.
- Administrator (A) – the user has no restricted access to requests. They can see all records registered in CDESK.
- Customer (C) – access to customer´s own requests, access to requests according to the organizational structure and according to the deal.
The meaning of each access and other options for setting access to the list of requests are described separately in the following sections. Working with the list of requests itself is described in this manual.
These default settings can be changed as required. Access cannot be changed except for users who belong to the Administrator (A) group. If you need to change permissions of a user from the Administrator (A) group, you need to move them to a different group.
Visibility of Companies
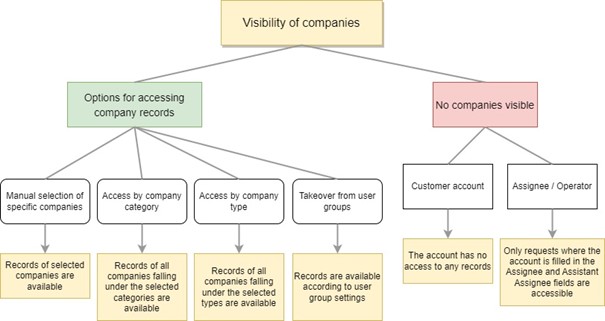
To let the customer account access requests, it is crucial to configure the company visibility. Company visibility can be determined in the following ways: by directly selecting the requested companies, by company category, by company type, and by taking over from a user group. The configuration of these settings is described in the following paragraphs.
Company visibility is not important if requests are made available based only on the Assignee and Assistant Assignee fields. Read more below in Making Requests Available for Assignees in the role of Assignee, Assistant Assignee and Responsible Person.
For more about the companies themselves and how they are formed in CDESK, see this manual.
Assignment to Company by Manually Selecting Specific Companies
The most straightforward way to assign an account to a company is to assign it directly to the selected company. If an assignee is about to be selected, the account has access to all the requests of the company and is also selectable as Assignee, Assistant Assignee and Responsible Person. If a customer account is about to be selected, there is only the option to enter its requests without visibility of the others. To access other requests, you need to enable some of the permissions such as Access to Others, Access to Records of Subordinates…
To assign an account to the company, go to Users and Groups -> Users -> select a specific user in the list -> Companies tab. On the tab, go to Settings for selected companies.
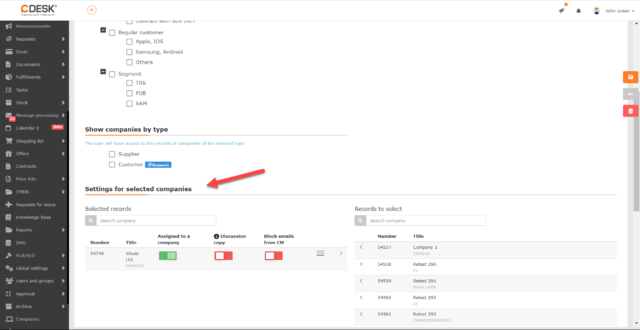
The list is divided into two parts: Selected Records and Records to Select. The Selected Records section contains the companies to which the account is assigned. The Records to Select section contains a list of all companies registered in CDESK. The procedure for creating a company in CDESK is described in this manual. To assign company to an account, click on the row with the selected company. Once clicked, the company will move to the Selected Records section. More than one company can be assigned.
Unassign – if the assignment needs to be unassigned, click on in the row for the company and the company will move back to the Records to Select section.
Company Visibility by Company Category
If multiple companies need to be accessed at the same time, all of which fall into the same categories, use the access companies by category option. To access a company by category, go to Users and Groups -> Users -> select a specific user in the list -> Companies tab. On the tab, go to Show Companies by Category.
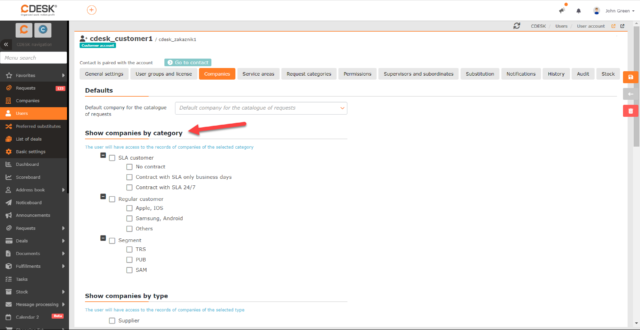
In the Show Companies by Category section, you will find a list of all company categories. The procedure to create company categories is described in this manual. Next to each category there is a checkbox ![]() . Clicking on this icon will mark the category
. Clicking on this icon will mark the category ![]() , which will give the user access to the requests of all companies that belong to that category. It is possible to mark more than one category at the same time.
, which will give the user access to the requests of all companies that belong to that category. It is possible to mark more than one category at the same time.
Unselect visibility by category – if you need to unselect visibility by a specific category, simply click the checkbox next to the category again ![]() and unselect the category. In this case, the checkbox is empty
and unselect the category. In this case, the checkbox is empty ![]() .
.
Company Visibility by Company Type
In addition to access by category, requests by company type can be accessed in the same way. The company types are described in more detail in this article.
To access companies by type, go to Users & Groups -> Users -> select a specific user in the list -> Companies tab. On the tab, go to Show Companies by Type.

In the Show Companies by Type section, you can find a list of all company types. Next to each type there is a checkbox ![]() . Clicking on this icon will mark the category
. Clicking on this icon will mark the category ![]() , which will give the user access to the requests of all the companies that have filled in the type. Multiple types can be marked at the same time.
, which will give the user access to the requests of all the companies that have filled in the type. Multiple types can be marked at the same time.
Deselect visibility by type – if you need to deselect visibility by type, just click the checkbox next to the type again ![]() , which will deselect it. In this case, the checkbox is empty
, which will deselect it. In this case, the checkbox is empty ![]() .
.
Taking Over Visibility from User Groups
If the user is part of a user group, he can take over the visibility of companies. As well as for a specific user, both the assignment to a company and the visibility by category and company type can be set for a group. In such a case, the setting is automatically applied to all members of the group. Access that has been taken over from a group carries the flag: „Taken over from the group: Group name„.
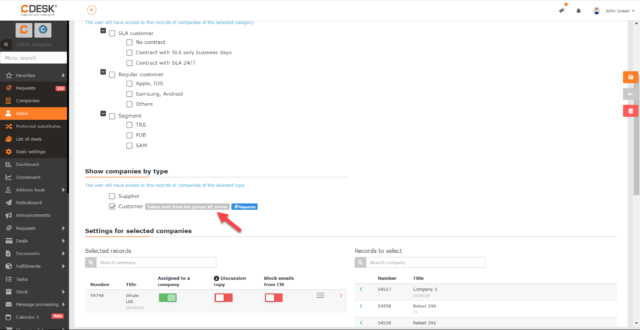
To set visibility for a group, go to Users and groups -> Groups -> select a specific group in the list -> Companies tab. On the tab you can set the visibility of companies by category, by type or visibility only for selected companies. The setup method is the same as for a specific user and the individual procedures are described in the paragraphs above.
Access to Your Own Requests
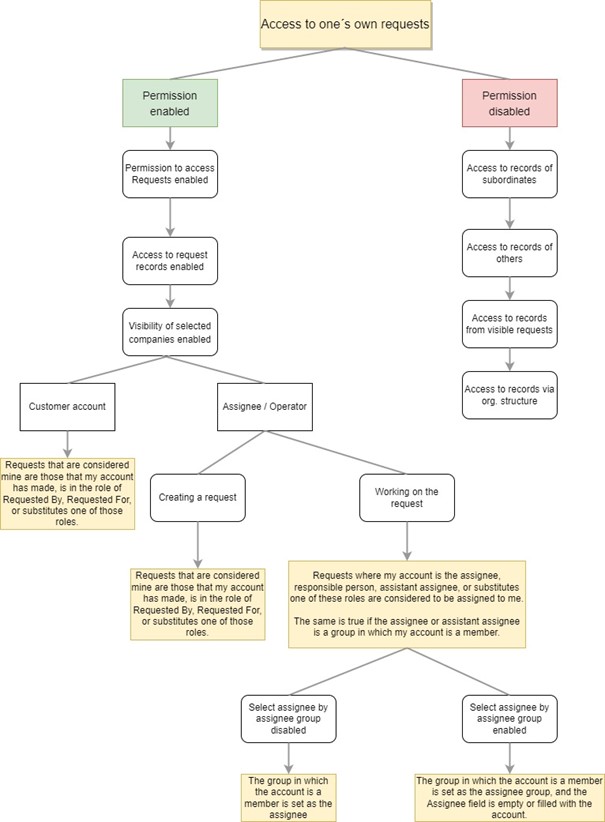
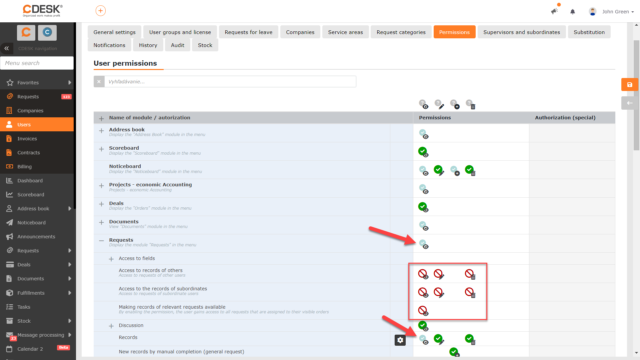
Any user with access to the Requests module and the Records permission enabled has access to their own requests. This access can be enabled in permissions (Users and Groups -> Users -> specific user -> Permissions tab -> Requests section). To access custom requests, the minimum visibility permission for the Records permission needs to be turned on, which is indicated by ![]() .
.
For the user to access only their own requests, the following permissions need to be disabled:
- Access to records of others
- Access to records of subordinates
- Access by org. unit of record
- Show records of others assigned to inaccessible deals
Custom requests are defined as records where the logged-in user:
- is the creator of the record – refers to the customer account, the assignee/operator
- is their assignee – only applies to the assignee/operator’s account
- is the responsible person – only applies to the account of the assignee/operator
- is an assistant assignee – applies only to the assignee/operator account
- is specified in the Requested By/Requested For field – refers to the customer account, assignee/operator
- is representing any of the roles listed above – refers to customer account, assignee/operator
- records assigned to the assignee group of the logged-in user – but only records that the user has access to are visible – applies to customer account, assignee/operator
- records where the user’s assignee group is set as an assistant assignee – but only records that the user has access to are visible – applies to customer account, assignee/operator
A user who only has the Access/Read permission enabled for the Records permission ![]() , will not be able to make any changes to the requests, they will only see them. To make changes available, the edit permission
, will not be able to make any changes to the requests, they will only see them. To make changes available, the edit permission ![]() must be enabled in addition to the access/read permission. If the ability to delete requests is also required, in addition to the access and edit permissions, the permission to delete records
must be enabled in addition to the access/read permission. If the ability to delete requests is also required, in addition to the access and edit permissions, the permission to delete records![]() .
.
If the edit/delete permissions are enabled only for the Records section and these permissions are not enabled for other requests, the user will only be able to edit/delete their own requests.
Access to Records of Subordinates
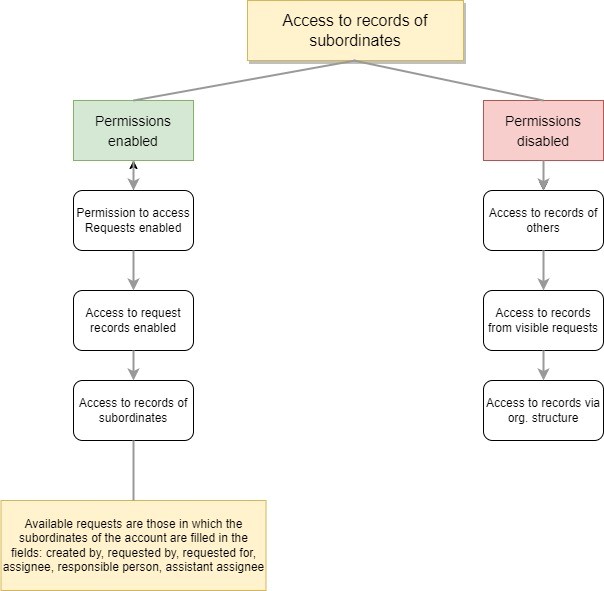
A user who has the Access / Read![]() option enabled for the Access to Records of Subordinates permission can see all records where both their subordinates and subordinates of their subordinates are filled-in in at least one of the following fields:
option enabled for the Access to Records of Subordinates permission can see all records where both their subordinates and subordinates of their subordinates are filled-in in at least one of the following fields:
- Created By
- Requested By
- Requested For
- Assignee
- Responsible Person
- Assistant Assignee
The user personally must be completed in these fields, not the user’s group. If the group which the subordinate is part of is filled-in in any of the above fields, but he is not directly selected, the parent user will not see the record.
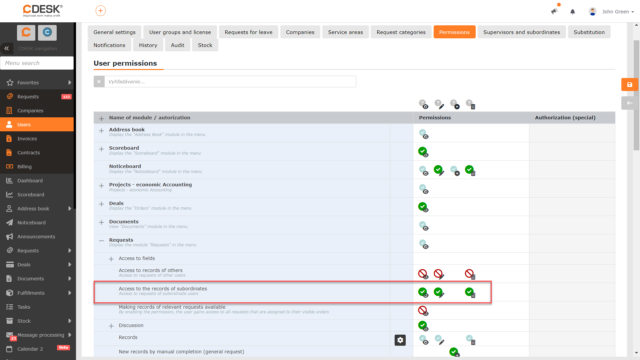
A user who has only the Access/Read permission ![]() enabled for the Access to Records of Subordinates permission, will not be able to make any changes to subordinate requests, only see them. To make changes available, in addition to the Access/Read permission, the Edit Record permission
enabled for the Access to Records of Subordinates permission, will not be able to make any changes to subordinate requests, only see them. To make changes available, in addition to the Access/Read permission, the Edit Record permission![]() must also be enabled. If the ability to delete requests of subordinates is also required, the permission to delete entries
must also be enabled. If the ability to delete requests of subordinates is also required, the permission to delete entries![]() must also be enabled. If the edit/delete permissions are enabled only in the Access to Records of Subordinates section and are not enabled for other requests, the user will only be able to edit/delete requests of their subordinates.
must also be enabled. If the edit/delete permissions are enabled only in the Access to Records of Subordinates section and are not enabled for other requests, the user will only be able to edit/delete requests of their subordinates.
Access to Requests of Others
Access to All Requests of Others at Visible Companies
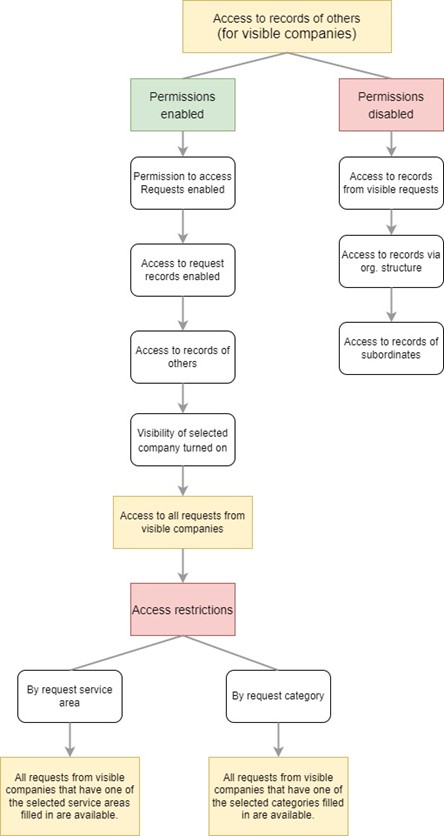
When the Access to Requests of Others permission is enabled, all requests from companies that the user has access to are made available to them.
This scenario may not always be satisfactory. Therefore, the display of records can be limited by the service area and by the request category. These options are described in more detail in the following paragraphs.
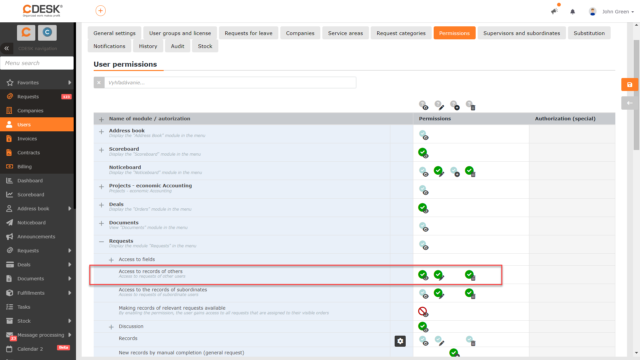
A user who has only the Access/Read permission ![]() enabled for the Access to Requests of Others permission, will not be able to make any changes to the requests of others, they will only be able to see them. To make changes available, in addition to the Access/Read permission, the Edit Records permission
enabled for the Access to Requests of Others permission, will not be able to make any changes to the requests of others, they will only be able to see them. To make changes available, in addition to the Access/Read permission, the Edit Records permission![]() must be enabled. If it is also necessary to delete requests of others, the permission to delete entries
must be enabled. If it is also necessary to delete requests of others, the permission to delete entries ![]() needs to be enabled. If the edit/delete permissions are enabled only in the Access to Requests of Others section and not for other requests, the user will only be able to edit/delete requests that are assigned to companies visible to them.
needs to be enabled. If the edit/delete permissions are enabled only in the Access to Requests of Others section and not for other requests, the user will only be able to edit/delete requests that are assigned to companies visible to them.
Restriction of Access by Request Service Area
Restricting views based on service area only works for users who have the Access to Requests of Others permission enabled. It is only available by default for assignee and operator type accounts. For a customer account, the restriction setting based on service area only becomes available if it is assigned to a user group. No specific settings need to be configured for the user group to make this restriction available to the customer. It is sufficient for the customer account to be a member of the group. For more information about including a user in the user group, see above Taking Over Visibility from User Groups.
Restricting the list of requests by service area can be set on the Service Areas tab that appears in the user form. (Users and Groups -> Users -> specific user -> Service Areas tab). If the tab is not displayed in the customer account form, it is necessary to assign this account to a user group.
The tab lists all service areas. Service areas can be created in Global Settings -> Requests -> Types, Categories and Service Areas and are described in this manual.
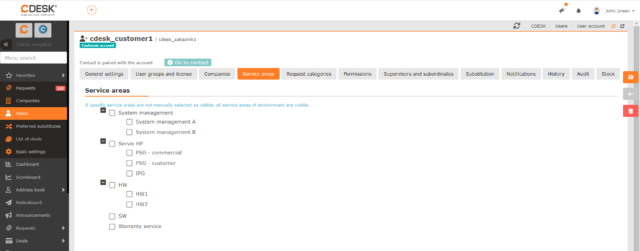
There is a checkbox next to each field ![]() . After checking a specific service area
. After checking a specific service area ![]() , the user will only have access to requests that have that area filled in. If no area is checked in the list, no restriction will be applied, and the requests will be visible for the user regardless of the filled service area. Likewise, no restriction will be applied if all service areas are checked.
, the user will only have access to requests that have that area filled in. If no area is checked in the list, no restriction will be applied, and the requests will be visible for the user regardless of the filled service area. Likewise, no restriction will be applied if all service areas are checked.
Restriction of Access by Request Category
Restricting the view based on the request category only works for users who have the Access to Requests of Others permission enabled and is available for all account types.
Restricting the view of the list of requests by request category works in the same way as restricting access by the request service area, which is described in the paragraph above. The restriction is set on the Request Categories tab that appears in the user form. (Users and Groups -> Users -> specific user -> Request Categories tab).
The tab lists all categories of requests. Request categories can be created in Global Settings -> Requests -> Types, Categories and Service Areas.

There is a check box next to each category. After checking a particular request category, the user will only have access to requests with that category filled in. If no category is checked in the list, no restriction will be applied, and the requests will be visible for the user regardless of the filled request category. Likewise, no restriction will be applied if all request categories are checked.
Making Requests Available to Assignees in the Role of Assignee, Assistant Assignee and Responsible Person
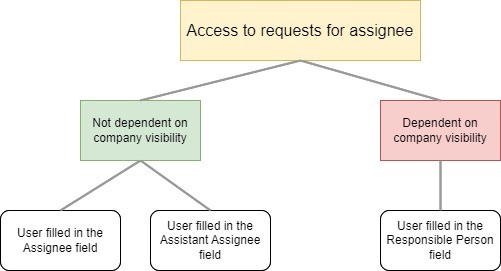
An assignee that does not have access to the request in any other way will gain access to it if they are filled in one of the fields:
- Assignee
- Assistant Assignee
The request is made available to the user even if they are filled in the Responsible Person field. However, the company needs to be visible for the assignee so they can be set as the responsible person. This restriction does not apply to the Assignee and Assistant Assignee fields.
Making Requests Available by Deal
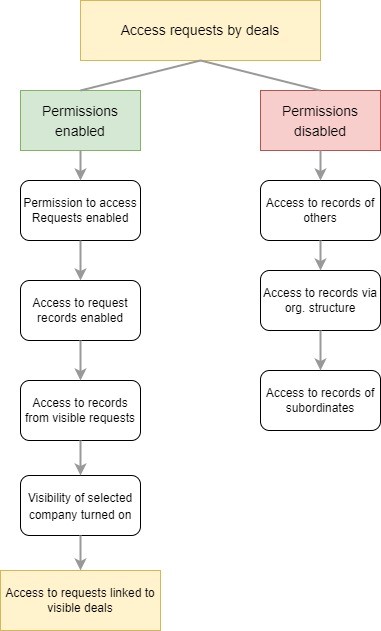
A user who has Access / Read ![]() option enabled for the Access to Records from Visible Deals permission, in addition to their own requests, can see other people’s requests linked to deals, and these deals are visible to them. However, only requests to companies accessible to that account are visible.
option enabled for the Access to Records from Visible Deals permission, in addition to their own requests, can see other people’s requests linked to deals, and these deals are visible to them. However, only requests to companies accessible to that account are visible.
This permission is appropriate to use when the user is the deal assignee and needs to have an overview of the requests linked to the deal.
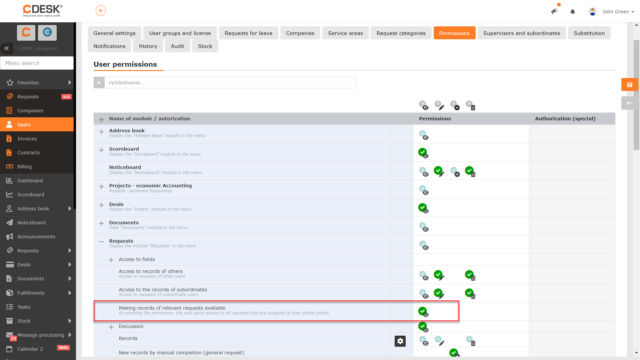
A user who has only the Access/Read ![]() permission enabled for the Access to Records from Visible Deals permission will not be able to make any changes to requests that have visible deals linked to them. They will only be able to see them. To make changes available, in addition to the access/read permission, the edit permission
permission enabled for the Access to Records from Visible Deals permission will not be able to make any changes to requests that have visible deals linked to them. They will only be able to see them. To make changes available, in addition to the access/read permission, the edit permission![]() needs to be enabled. If the ability to delete these requests is also required, the permission to delete
needs to be enabled. If the ability to delete these requests is also required, the permission to delete ![]() needs to be enabled. If the edit/delete permissions are enabled only in the Access to Records from Visible Deals section and these permissions are not enabled for other requests, the user will only be able to edit/delete requests linked to deals that are visible to them.
needs to be enabled. If the edit/delete permissions are enabled only in the Access to Records from Visible Deals section and these permissions are not enabled for other requests, the user will only be able to edit/delete requests linked to deals that are visible to them.
Access by Organizational Structure
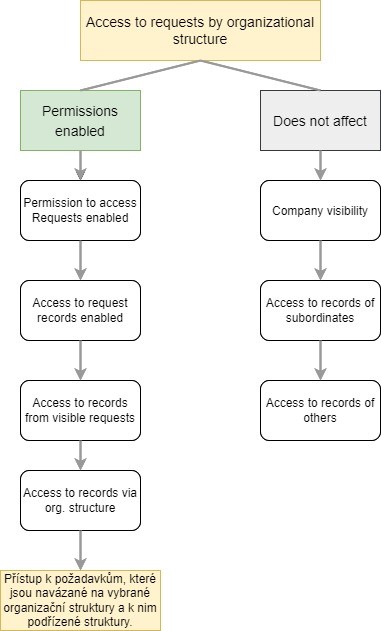
In addition to access to other people´s requests, access based on superiority to other users (Access to Records of Subordinates permission) and access according to deals (Access to Records from Visible Requests), requests can be set independently of these accesses according to the organizational structure.
The organizational structure is registered in CDESK thanks to the AD/LDAP connector we introduced in this manual. Once the connector is configured, the Organizational Structure tab appears in the user form, showing the organizational structure of the company and the user’s place within it.
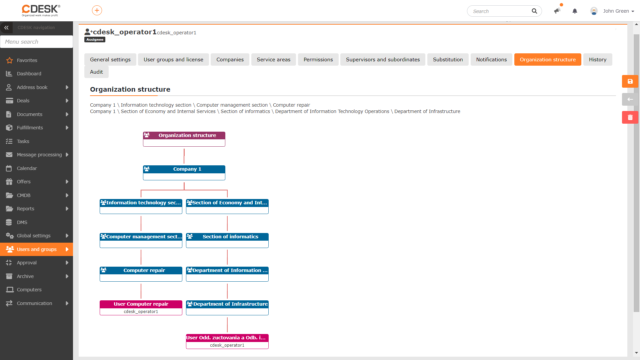
is enabled for the Access by Record Org. Unit permission, the user will see requests that are linked to their organizational unit and all organizational units subordinate to it, in addition to their own requests.
If necessary, it is possible to manually select other organizational units whose requests will be accessible to the user.
A user who has only the Access/Read permission enabled for the Access by Record Org. Unit permission ![]() , will not be able to make any changes to requests that are tied to organizational units available to them. They can only see them. To make changes, the edit permission
, will not be able to make any changes to requests that are tied to organizational units available to them. They can only see them. To make changes, the edit permission ![]() must also be enabled. If the ability to delete these requests is also required, the permission to delete
must also be enabled. If the ability to delete these requests is also required, the permission to delete![]() also needs to be enabled. If the edit/delete permissions are enabled only for specific organizational units in the Access by Record Org. Unit section and these permissions are not enabled for other requests, the user will only be able to edit/delete requests that are linked to the organizational units that are accessible to them.
also needs to be enabled. If the edit/delete permissions are enabled only for specific organizational units in the Access by Record Org. Unit section and these permissions are not enabled for other requests, the user will only be able to edit/delete requests that are linked to the organizational units that are accessible to them.
Restriction of Access by Selecting Specific Requests

In practice, there may be situations where the permissions described above are used to access requests, but it is not desirable for the user to access all these requests. In such a case, it is possible to restrict access to specific records.
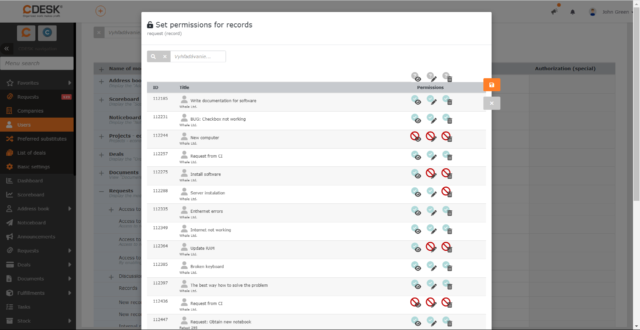
To restrict access to specific records, click the icon located in the Records permission line ![]() .
.
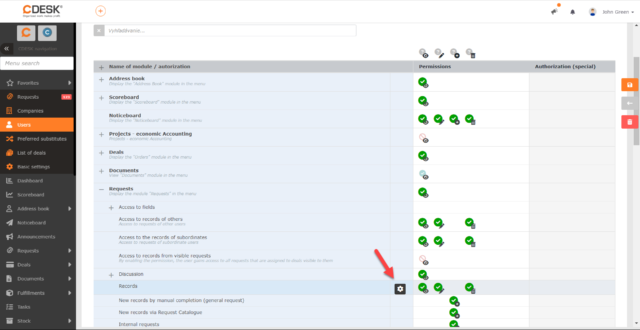
When clicked, a modal window appears listing the accessible records. A search box located above the list is used to search for specific records. In the row of each record there are icons for permission to see the record ![]() ,permission to edit the record
,permission to edit the record ![]() and permission to delete the record
and permission to delete the record ![]() . Clicking on any of these icons in the row of a particular record will change the permissions for that record only. In this way, you can only restrict permissions to requests that are already accessible. It is not possible to access a request that is not within the permissions of that user. For example, if the user only has access to their own requests, it is not possible to give them access to someone else’s request.
. Clicking on any of these icons in the row of a particular record will change the permissions for that record only. In this way, you can only restrict permissions to requests that are already accessible. It is not possible to access a request that is not within the permissions of that user. For example, if the user only has access to their own requests, it is not possible to give them access to someone else’s request.
